Stitching 101
Trouble Shooting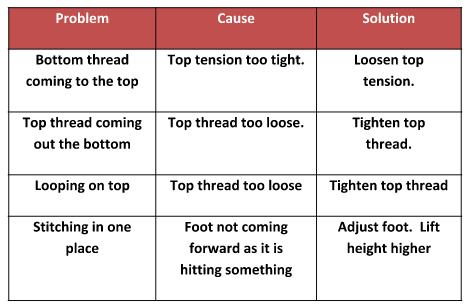
Identify what your issue is.
Read through the Problem column below and consider each. If in doubt use a sample piece of similar material, contrasting thread and different colour top and bottom. This way you can see the Problem easier. Use same thickness threads as you are having the problem with. The L Test
|
Threading diagram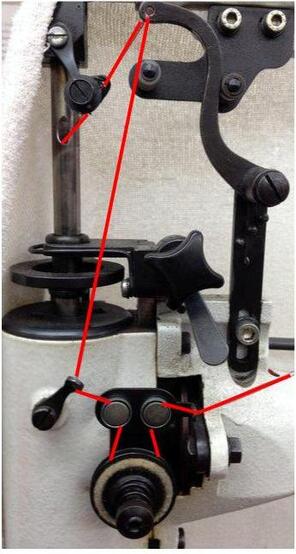
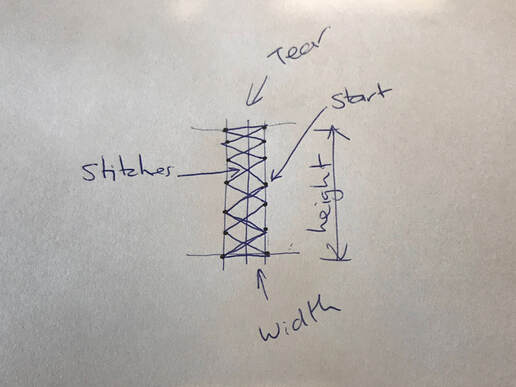
The L is 5cm by 3cm with 1cm thickness.
Change bottom thread first as if you need to refill the bobbin it is quicker this way. As you dont need to snip the thread at the top again. Speed control, tap tap on the foot pedal to get the feel. |
Start and stop stitching at a point of least stress – otherwise it will come undone.
Generally go back 3 stitches at the start and finish, unless you have gone right around and back over your first row, or if you are doing more of a “look good” repair, ie top stitching in a visible area. In which case make sure you go about 10 stitches away from a stress point. A stress point is any point where stitching is more likely to come under strain, like on joins or at the end of Velcro, or where straps attach etc.
Cut threads as you go, cut once next to the shoe nice and tidily.
If the threads are in a tricky place like the toe of a shoe. Cut the threads by pulling both threads to the outside of the shoe, and trim. This way you don’t have to reach inside the shoe with the snips.
Look or feel underneath after 4 stitches when moving to thicker or thinner items.
Zig zag Stitching
Let tension off slightly to stop bottom thread from pulling up to the top
Select a longer stitch length.
Select a longer stitch length.